Pneumatic Timers: How to Select the Right Model for Your Circuit
Pneumatic timers are selected incorrectly when buyers start with the timing range alone. A 30-second delay does not tell you whether the timer should provide an on-delay, off-delay, pilot signal, direct valve output, visible countdown, long dwell timing, or fast reset before the next cycle. The right timer is the one whose behavior matches the circuit, not the one whose catalog range includes the required number of seconds.
At Ellis/Kuhnke Controls, we help customers choose pneumatic timers by starting with the circuit. The timer’s timing range matters, but the selection also depends on what starts the timing cycle, what happens when the delay ends, how the output valve behaves, where the timer mounts, how quickly the timer resets, and the air conditions it will encounter in use.
Start With the Circuit Job, Not the Timer Range
The first selection question should not be, “Which timer covers my delay?” The better question is, “What job does the timer need to perform inside the circuit?” A timer may need to delay a pilot signal, hold a clamp before release, create dwell time before a valve shifts, delay cylinder movement, or give an operator visible confirmation of a timed cycle.
Those jobs require different timer behavior. A timer that provides only short on-delay logic does not solve the same problem as one with on-delay and off-delay output options. A timer with a visible countdown face does not solve the same problem as a rear-mounted logic timer hidden inside a panel. A timer with a 4-way valve behaves differently from one with a 3-way output.
A useful selection process starts by defining the timer’s role:
- The timer delays a signal before another component acts.
- The timer holds or delays a release after a signal changes.
- The timer directly changes a pneumatic output.
- The timer pilots another valve.
- The timer gives an operator visible timing feedback.
- The timer supports a long dwell, purge, hold, or process delay.
EKCI’s product line shows why these matters. Series 51, PMT, 51020, PT, and 54 Series timers all provide time delay, but they do not answer the same circuit question. The selection process should separate those questions before comparing model numbers.
Decide Whether the Circuit Needs On-Delay or Off-Delay
On-delay and off-delay should be decided before model selection. On-delay waits after the signal appears before the timer provides output. Off-delay supports delayed action after the initiating signal changes or is removed, depending on timer design and plumbing. Selecting the wrong delay function can reverse the intended machine behavior.
A clamp sequence gives a simple example. If the circuit needs a delay before a clamp engages, an on-delay function may fit. If the circuit needs the clamp to remain engaged briefly after the signal changes, an off-delay function may be the better match. The timing range may be identical in both cases, but the circuit behavior is not.
This is where the EKCI product options help explain the decision. Series 51 offers on-delay normally closed and off-delay normally open versions. PT timers also offer on-delay and off-delay output options. The 54 Series can provide on-delay or off-delay behavior through plumbing. PMT is different because it is an on-delay logic-output timer; therefore, it should not be selected for a circuit that needs off-delay behavior.
Do not choose PMT when the circuit needs off-delay timing. Use a timer family that supports off-delay behavior, such as Series 51, PT, or the correctly plumbed 54 Series, depending on the rest of the circuit requirements.
Decide Whether the Timer Should Pilot Another Device or Change the Circuit Directly
The next decision is the output role. A timer can provide a delayed pilot signal to another component, or the timer can include valve behavior that directly changes the circuit state. Those are not interchangeable roles.
A pilot-output timer belongs in the logic side of the circuit. It sends a delayed signal to another valve or control device. A direct-output timer, or one with built-in valve behavior, plays a larger role because the timer itself changes the pneumatic output after the delay. If a buyer expects a pilot-output timer to drive a function it was not meant to drive, the result can be weak output, missed actuation, or unreliable sequencing.
EKCI options make this distinction clear. PMT fits short-on-delay logic applications where a separate control signal starts timing, and the delayed output belongs in the control logic. Series 51 includes built-in 3-way valve behavior for short timing applications where the output valve role matters. PT includes a multi-purpose 3-way output valve that can work as a normally open, a normally closed, or a diverter. The 54 Series uses a 4-way valve and should be evaluated when the circuit needs that valve arrangement with longer timing capability.
The selection rule is simple: do not pick a timer only because the delay range matches. Pick the timer based on what the output must do after the delay ends.
Match the Start Signal to the Timer Design
The timer has to match the signal that starts the timing cycle. Some timers start when pressure is applied directly to the timed line. Some require a separate pilot or control signal. Some designs use a timing mechanism that operates independently of the control pressure after the cycle begins.
This matters because a timer does not operate in isolation. The tubing run, pilot pressure, control signal stability, and reset path can all affect field performance. If the timer receives a weak or unstable start signal, it may appear inaccurate even when the model itself is correct.
Series 51 can start by direct connection of the pressure line to 1/8-inch NPT side-ported models, or by a separate pilot signal. PMT starts when a separate control signal sets the timer's vacuum. PT starts when a motor diaphragm receives control pressure. The 54 Series uses a separate control signal that drives a regulated air motor and gear chain.
Do not use a timer that requires a stable pilot signal if the circuit cannot provide one. Fix the signal condition or choose a timer arrangement that fits the available control signal.
Choose the Timing Range After the Function Is Clear
Timing range still matters, but it should come after the circuit role is defined. A buyer should identify the shortest and longest required delays, the required adjustment precision, and the likely field adjustment behavior. The broadest range is not always the best choice, because a wide range can make fine adjustments impractical.
Short-cycle timing, visible panel timing, flexible mid-range timing, and multi-hour timing are different selection situations. Series 51, PMT, and 51020 all fit short timing needs, but they serve different roles. PT covers a broader range up to 60 minutes and adds flexible output behavior. The 54 Series covers long timing needs up to 100 hours and belongs in a different category from short-cycle timers.
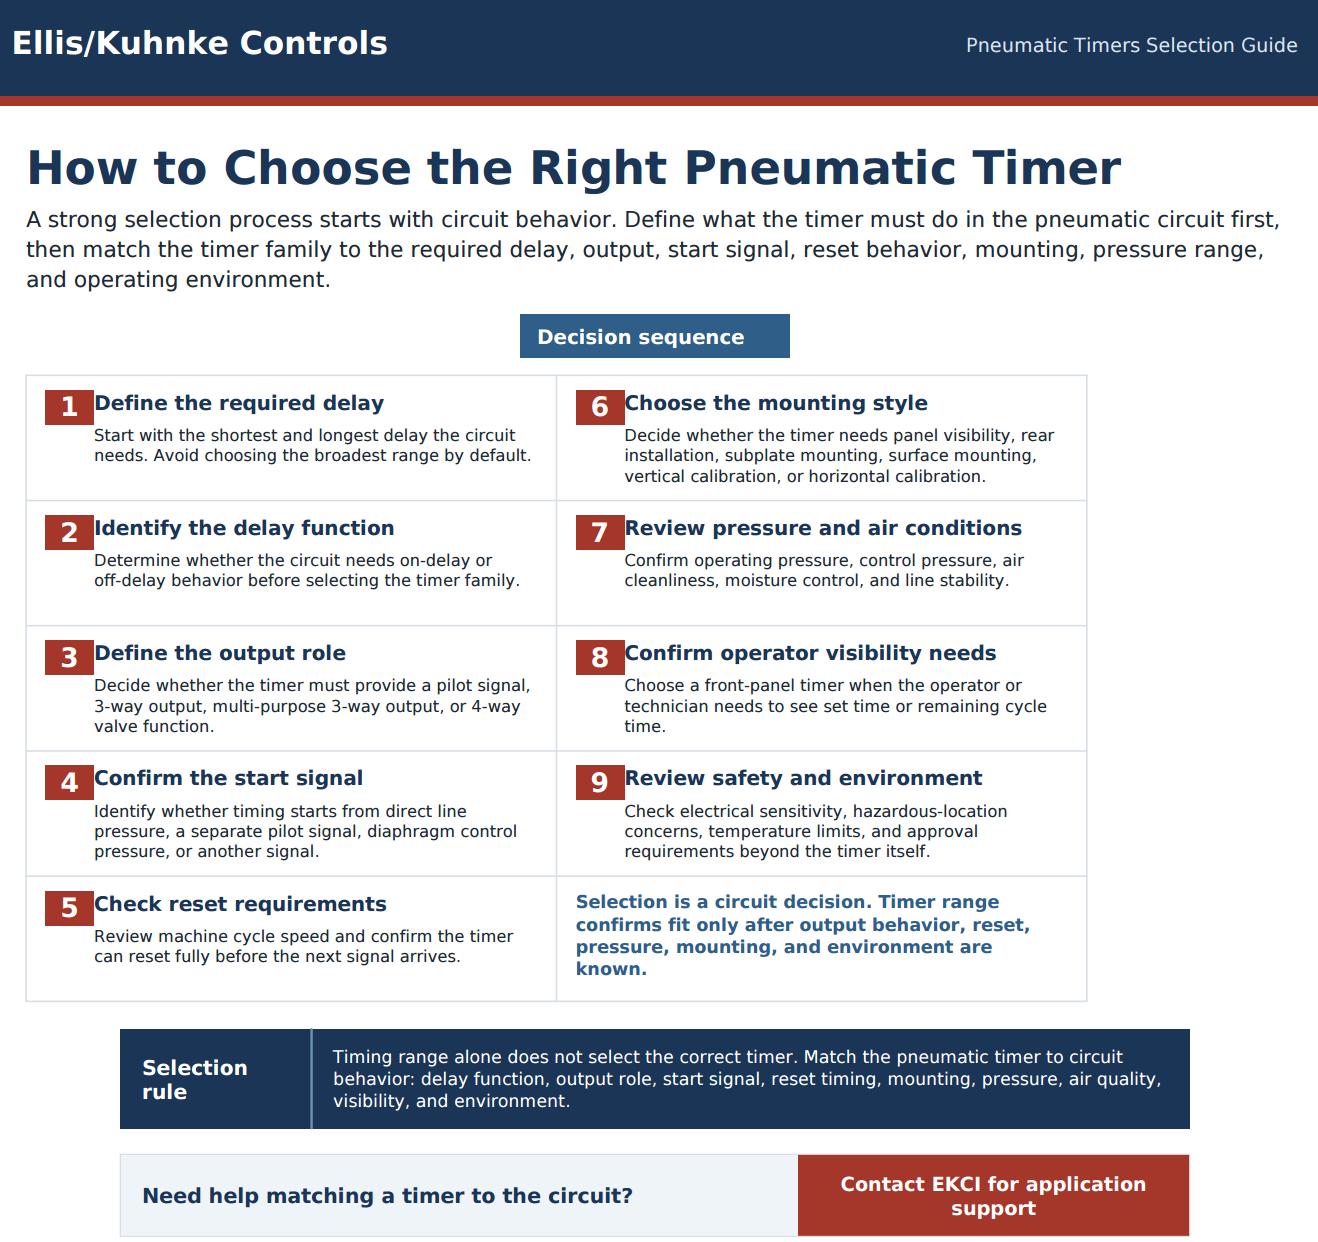
A better decision sequence looks like this:
- Define the circuit action.
- Choose on-delay or off-delay.
- Define pilot output vs. direct output behavior.
- Confirm the start signal.
- Then choose the timing range.
This order prevents the buyer from choosing a timer that reaches the right delay but performs the wrong job.
Decide Whether the Operator Needs to See the Timing Cycle
Some timers belong inside the control layout. Others need to be visible at the operator interface. Visibility is not cosmetic when the operator or maintenance technician needs to confirm set time, remaining time, or cycle status without opening a panel.
A hidden timer may be correct when the setting is rarely changed. A front-panel timer makes more sense when timing needs to be verified during setup, troubleshooting, or normal operation. If the operator needs to see the countdown, the selection should include display style, dial access, and panel mounting before the final model choice.
The 51020 mini timer is the clearest EKCI example for this selection point. It has a front dial, a clear lens, and two vertical scales showing set time and time remaining in the cycle. The 54 Series also supports front-panel timing visibility for longer timing ranges. PMT, PT, and Series 51 may better meet other circuit needs, but they should not replace a visible panel timer when operator readability is part of the requirement.
Do not hide the timer inside a cabinet when the process depends on visible time verification. Choose a panel-visible timer when timing status is part of the machine operation.
Confirm Reset Behavior Before Using the Timer in a Repeat Cycle
Reset behavior matters in repeat-cycle machines. A timer must fully return to its starting condition before the next timing cycle begins. If the next signal arrives before the reset is complete, the timer can produce short or inconsistent delays, or behavior that appears to be timing drift.
This is especially important in machines with rapid cycling or repeated pneumatic signals. A timer used in a slow-dwell application may fail in a fast sequence because it never fully resets between cycles. The buyer should compare the machine cycle rate against the timer’s reset behavior before choosing the model.
Series 51 lists an approximate reset time of 200 ms. The 54 Series also resets automatically after the control pressure signal is removed, with an approximate 200 ms reset. PMT resets automatically after the control signal is removed. Those details should be part of the selection, not troubleshooting after installation.
Do not assume a timer will work in a fast sequence because the delay range is correct. Confirm that the reset time fits the machine cycle.
Match the Mounting Style to Access, Tubing, and Replacement Needs
Mounting style affects installation, access, tubing layout, replacement, and operator interaction. It should not be treated as an afterthought. A timer can be correct electrically or pneumatically and still be a poor fit if the mounting arrangement makes the system harder to service.
Panel mounting works when the timer needs visibility or front-side adjustment. Rear mounting and subplate mounting support compact control layouts. Surface mounting places the timer closer to the machine function. Horizontal or vertical orientation can matter when calibration depends on the installed position.
EKCI product families show how mounting changes the decision. Series 51 offers 1/8-inch NPT side ports or 10-32 bottom ports, with bottom-ported timers that are panel-mountable. PMT offers subplate mounting, along with vertical and horizontal panel bezel options. PT supports panel or surface mounting and can be calibrated for horizontal mounting when needed. The 51020 is panel-mounted with rear ports and front visibility.
Do not treat mounting as a bracket choice. Choose the mounting style based on how the timer will be installed, read, adjusted, and replaced.
Check Pressure Range and Air Quality Before Blaming the Timer
Pneumatic timing depends on controlled air movement. The timer’s internal mechanism, valve movement, diaphragm response, restrictions, passages, and reset action all depend on the air system feeding the circuit. A correct timer can still behave poorly if the air is wet, dirty, oily, unstable, or outside the required pressure range.
Particles can restrict small passages. Moisture can cause corrosion, drag, or sticking. Oil contamination can create deposits that change internal movement. Unstable pressure can affect signal initiation, output behavior, or reset timing. These conditions often appear as timing drift or inconsistent delays, even when the timer was selected correctly.
The timer family should also check the pressure range. PMT operates from 15 to 100 psi. PT timing action starts from the diaphragm control pressure of 5 to 140 PSIG. The 51020 operates from 30 to 90 psi. The 54 Series operates across a broad pressure range and uses a regulated air motor and gear chain to maintain timing despite fluctuations in control air pressure.
Do not replace a timer before checking the air feeding the timer. The problem may be contamination, pressure instability, poor tubing layout, incomplete reset, or the wrong timer role in the circuit.
Use EKCI Timer Families as Selection Proof, Not a Product List
The timer family should enter the decision after the circuit need is clear. EKCI’s product line offers buyers several ways to address timing issues, but each family follows a different selection logic.
Use this as a practical guide:
| Circuit question | Better selection direction | EKCI examples |
|
Do you need short timing with built-in 3-way behavior? |
Look for a short-range timer with a built-in valve output. |
Series 51 |
|
Do you need a short, delayed pilot signal? |
Look for short on-delay logic output. |
PMT |
|
Do you need visible short timing at the panel? |
Look for front-panel set time and countdown visibility. |
51020 |
|
Do you need flexible output and timing up to 60 minutes? |
Look for on-delay or off-delay with a multi-purpose 3-way output. |
PT |
|
Do you need long timing up to 100 hours? |
Look for long-range panel timing with 4-way valve behavior. |
54 Series |
|
Do you need timing despite pressure fluctuation? |
Look for a timing architecture designed for that condition. |
54 Series |
|
Do you need an operator-readable countdown? |
Look for panel display and remaining-time visibility. |
51020 or 54 Series |
This is the right balance. Teach the selection question first. Then show how EKCI products fit that decision. The product does not lead the conversation. The circuit needs.
How to Choose the Right Pneumatic Timer
A strong selection process starts with circuit behavior. The timing range comes first, only after the rest of the circuit requirements are understood. For most buyers, the better process is to define the timer’s job, then match the timer family.
Download Pneumatic Timer Selection Guide
Match the Timer to the Circuit First
Pneumatic timer selection should not start and end with the number of seconds on the label. The right timer depends on how the timing cycle starts, what happens when the delay ends, how the timer resets, how the output behaves, where the timer mounts, and whether the air system supports repeatable timing.
At Ellis/Kuhnke Controls, we help customers choose pneumatic timers by starting with the circuit. That approach prevents a simple timing question from becoming a sequence, maintenance, or machine downtime problem.
Related Reading


- Ellis/Kuhnke Controls
132 Lewis Street Unit A-2, Eatontown, N.J. 07724
Phone: 1-800-221-0714
Fax: 732-291-8154
Email: Info@ekci.com
- Home Pneumatic Controls Technical Info CAD Drawings Contact Us Pneumatic Timers Blog Site Map